blog / · updated · 8 min read
Devboxes on Demand: Isolated VMs on a Single Server With Incus and Ansible
One script that turns a bare-metal server into a provider of isolated, pre-provisioned virtual machines. Incus, LXD or Vagrant, hardware profiles, a NAT bridge, SSH ProxyJump and the security model behind it.
Sooner or later, every IT team gets the same request:
“Can you give me a Linux machine to work on? Something powerful, for a few weeks.”
That request kept coming, and the default answer was a virtual machine in the cloud. When we did the maths, it turned out to be cheaper to rent one oversized server and run our own virtual machines on top of it. And since we were going to do it more than once, we automated the whole process so it could be repeated as many times as needed.
The result is remote-devbox-provisioner. You take one server, run one script, and get an isolated virtual machine with a user, a size and an SSH key, reachable only through the host. Run it again with another name, and you have a second one.
Why one big server instead of cloud VMs
Cloud VMs are convenient, but for development machines the maths is often poor. A dedicated server from providers like Hetzner or OVH gives you dozens of cores and hundreds of gigabytes of RAM for the monthly price of two or three mid-sized cloud instances. Split it into virtual machines and you get:
- Predictable cost. One fixed monthly bill, whether there are two devboxes or twelve.
- Full isolation between users. Each person gets a real VM with its own kernel, not a shared login on a shared machine.
- Root inside, nothing outside. Users can break their own VM as much as they like; they cannot touch the host or each other.
- Speed. A new devbox is a command away, not a ticket to the cloud team.
The tool works on any Ubuntu host with hardware virtualisation: bare metal, a home lab, or a cloud VPS with nested virtualisation enabled.
Architecture
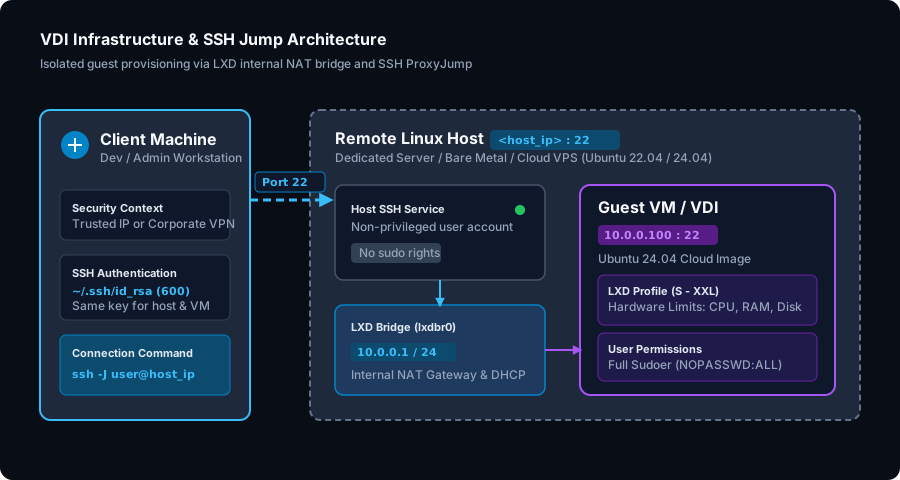
The design rests on a few deliberate decisions:
- Only SSH is exposed, and only to trusted sources. The host listens on port 22, restricted to a VPN or a known IP range by the provider firewall or
ufw. Nothing else is reachable from outside. - VMs live on a private NAT bridge. Guests get static addresses in
10.0.0.0/24and have no public exposure at all. They reach the internet through NAT; the internet cannot reach them. - The host account has no privileges. Each user gets a host account without
sudo. Its only purpose is to be a jump point. - Inside the VM, the user is root. Passwordless
sudoin their own machine, which is the whole point of a devbox. - Connections use SSH ProxyJump. The client jumps through the host to the VM in a single command, without port forwarding or extra services.
Three backends, one workflow
The repository contains three implementations of the same idea, from the most classic to the one I recommend:
| Backend | How it is installed | Why |
|---|---|---|
| Incus (recommended) | Native .deb packages from the Zabbly repository | Community fork of LXD, no Snap, full access to the Linux Containers image server |
| LXD | Snap | Canonical’s original; works well if you are already on Snap |
| KVM-QEMU with Vagrant | libvirt plus the vagrant-libvirt plugin | The classic approach, kept for comparison |
The first version used Vagrant with libvirt. It works, but Vagrant was designed for local development environments, and on a server it shows: boxes from third parties, a Ruby toolchain, and libvirt’s XML underneath whenever you need something unusual.
LXD was a big step forward. It wraps KVM in a clean REST API and a declarative model of profiles, networks and storage pools, which makes it trivial to automate from Ansible or a shell script. It also runs system containers with the same commands, which is handy when a full VM is overkill.
Incus is the recommended option. When Canonical took LXD in-house and changed its licensing, the community forked it as Incus under the Linux Containers project, led by LXD’s original author. For this use case, the practical differences are what matter: Incus installs from a normal APT repository without Snap, and it keeps full access to images.linuxcontainers.org, with cloud images for Ubuntu, Debian, Fedora, Alpine and more. The commands are almost identical (incus instead of lxc), so moving between them is painless.
Initialising the host declaratively
Incus and LXD can be initialised from a preseed file instead of answering the interactive wizard. The whole host configuration fits in a few lines:
networks:
- name: incusbr0
  type: bridge
  config:
    ipv4.address: 10.0.0.1/24
    ipv4.nat: "true"
    ipv6.address: none
storage_pools:
- name: default
  driver: dir
profiles:
- name: default
  devices:
    eth0: {name: eth0, network: incusbr0, type: nic}
    root: {path: /, pool: default, type: disk}
incus admin init --preseed < preseed.yaml
A private bridge with NAT, a storage pool and a default profile that attaches every instance to both. Because the file is declarative, the playbook checks whether the pool already exists and skips the step on later runs.
Hardware profiles: T-shirt sizes for VMs
Instead of asking for CPU and memory every time, the playbook creates five profiles, from small to absurdly large:
| Profile | CPU | RAM | Disk |
|---|---|---|---|
s-vm-profile | 1 | 2 GB | 20 GB |
m-vm-profile | 2 | 4 GB | 40 GB |
l-vm-profile | 4 | 8 GB | 60 GB |
xl-vm-profile | 4 | 16 GB | 80 GB |
xxl-vm-profile | 16 | 64 GB | 6 TB |
Each profile is a small YAML document applied with incus profile edit:
config:
  limits.cpu: "4"
  limits.memory: "8GB"
devices:
  root:
    path: /
    pool: default
    size: 60GB
    type: disk
  eth0:
    name: eth0
    nictype: bridged
    parent: incusbr0
    type: nic
Profiles stack, so a VM is created with default (network and storage) plus one size, and changing a size later is a matter of editing the profile or swapping it on the instance.
Creating the VM
With the host ready, creating a devbox is three commands:
incus init images:ubuntu/24.04 carlos-vm --vm --profile default --profile m-vm-profile
incus config device set carlos-vm eth0 ipv4.address 10.0.0.101
incus start carlos-vm
The static address is a DHCP reservation on the bridge, so it survives reboots and the user always knows where their machine is. The --vm flag is the only difference between a full virtual machine and a system container; the playbook exposes it as vm_type for when a container is enough.
Configuring the guest without SSH
The neatest trick in the repository is how Ansible configures the guest. There is no SSH server to set up first and no keys to distribute to Ansible: the inventory uses the Incus connection plugin from community.general, which runs every task through incus exec:
all:
  vars:
    ansible_connection: community.general.incus
    ansible_user: root
  hosts:
    carlos-vm:
The host playbook generates that inventory, and the second playbook uses it to upgrade the guest, create the user with passwordless sudo and install their public key in authorized_keys. Ansible talks to the VM through the Incus API, as if it were local.
One script, many users
Everything is wrapped in setup.sh, which installs Ansible from the official PPA (distribution packages tend to be too old for current collections), installs community.general and runs both playbooks. Any argument is passed through to Ansible, so each devbox is one line:
sudo ./incus/setup.sh -e "username=carlos vm_profile=m-vm-profile ipv4_address=10.0.0.101"
sudo ./incus/setup.sh -e "username=ana vm_profile=s-vm-profile ipv4_address=10.0.0.102"
The script is idempotent. Running it again for a new user leaves the existing Incus setup, bridge and profiles untouched, and only creates the new account, key and VM.
Connecting
The user connects with one SSH command that jumps through the host:
ssh -i ./carlos.key -J carlos@<host_ip> [email protected]
Or, more comfortably, with an entry in ~/.ssh/config:
Host devbox
    HostName 10.0.0.101
    User carlos
    IdentityFile ~/.ssh/carlos.key
    ProxyJump carlos@<host_ip>
After that, ssh devbox works, and so do scp, rsync and remote development in VS Code or JetBrains, which all understand ProxyJump.
The firewall around it
The provisioner assumes the host is already locked down, and the README includes a reference rule set for a provider firewall:
| Direction | Rule | Action |
|---|---|---|
| Inbound | ICMP and SSH from the trusted IP or VPN only | Accept |
| Inbound | Return traffic of established connections | Accept |
| Inbound | Everything else | Drop |
| Outbound | SMTP on ports 25 and 465 | Drop |
| Outbound | Everything else | Accept |
Blocking outbound mail ports is easy to forget and important: give people root on a VM with internet access, and sooner or later someone (or something) will try to send mail from it. Providers suspend servers for less. Without a provider firewall, the same rules take five lines of ufw.
What I would do differently today
The repository is a working tool, not a product, and writing this article was a good excuse to look at it critically:
- Generate keys on the client, not the server. The playbook creates the keypair on the host and the user copies the private key out with
scp. It is convenient, but a private key should never leave the machine it belongs to. Asking for the user’s public key is better. - Use separate keys for the host and the VM, and Ed25519 instead of RSA.
- Wait for the guest, not the clock. The playbook pauses 60 seconds after starting the VM. Polling until
incus exec <vm> -- truesucceeds is faster and more reliable. - Allocate IP addresses automatically. Choosing a free address by hand works for five users, not for fifty.
- Bind the Incus API to localhost. The preseed listens on port 8443 on every interface. The firewall blocks it, but there is no reason to expose an API that nobody uses remotely.
- Add a teardown command. Creating devboxes is automated; deleting them, along with the host account, still is not.
What comes next
Devboxes solve the “give me a powerful machine for a few weeks” case very well. They are less suited to many people who need short-lived desktops with single sign-on, and no SSH keys to manage. That is a different problem, and in a later article I tackle it with Kubernetes: one desktop pod per user, in the browser, created at login and destroyed at logout.
The code is on GitHub: pixelotes/remote-devbox-provisioner.
Sources